PIL is Python Image Library. It allows you to load image data and modify it in many ways.
The way you import PIL depends on what Python environment you’re using.
JupyterLab:
JupyterLab server comes with PIL already installed. You may experience an error the first time you try to import it, but then it works later for no apparent reason. This is what happened to me a couple of times, at least. The instructions for replit.com below will also work for Jupyter.
replit.com
Since replit.com is a cloud application, you can run it without installing software on your PC. However, avoid doing intensive processing on large, high resolution images since replit.com servers provide somewhat limited processing speed and volume. Replit.com might quit in the middle of an image if the file is too large.
Before you can run this code in replit.com, you will need to click “Shell” and install the “Pillow” Library:
pip install Pillow
Here is what it looks like (click “Shell” or “Terminal” first):

Sample code importing PIL:
from PIL import Image
img = Image.open('fruit.jpg')
#code to modify img object
img.save('new_img.jpg')
You’ll need to upload your image file in the file browser on the left side of your repl.it window:

You can’t use the show() function in repl.it, so you’ll instead need to save the image object as a file and view that file.
The new file will appear in your file browser, and you can click it to see the image.
Sometimes you’ll need to delete the old version of that file before you run your program again, because repl.it doesn’t always properly overwrite an existing image file.
Give your new file a different name from the original image file. If you don’t, you will modify the original, and you’ll probably need to upload it again later.
VS Code
If you have VS Code on your own computer (or if you’re using a portable version), you will need to install the pillow module from the Terminal (command line):
pip install Pillow
If you don’t have permission to install it that way, you can install in your user app data folder instead:
pip install Pillow --user
You will need to open a folder in VS Code.
Create a python code file. (Its name must end with “.py”)
Try importing PIL as follows, and then run the code.
from PIL import Image
If that runs without errors, proceed to the next step. If not, you will need to figure out how to get PIL imported properly, which might be annoying and tricky. Google the error message or get assistance or try some different things.
Next, put an image file into your folder. If the image isn’t in the same folder as your code, the code won’t work.
Browse to the folder and move the file there.
Tip: right click your python code file in VS Code explorer pane, and click “Reveal in File Explorer.”
You should see your image file and code file in the same folder. Example – notice “image_test.py” and “doge.jpg” files on the explorer side of the screen. If “doge.jpg” isn’t there, the code will not work.

The example above will let you see the image, but there is another way to look at the image object, img.
You can delete the “img.show()” line and instead run the program with Jupyter.
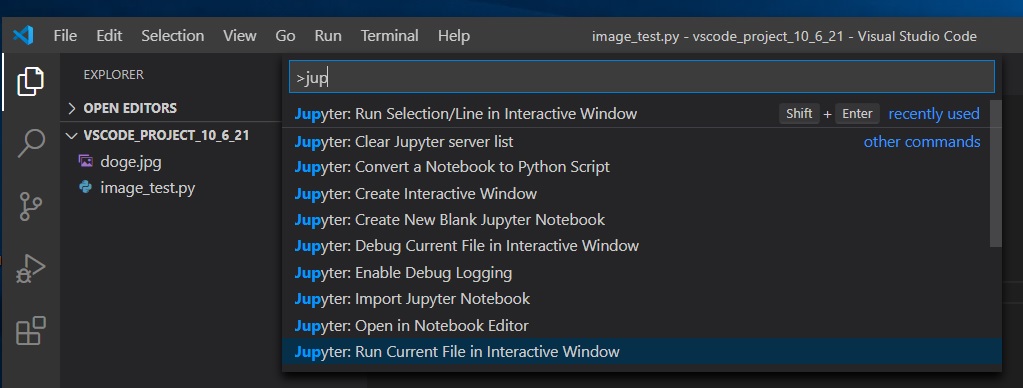
Push Control-Shift-P and bring up the command palette. Type “Jupyter” and scroll down to “>Jupyter: Run Current File in Interactive Window” as follows:
The first time you do that, you might need to install ipykernel extension. Click install when this pops up.
The next time you want to run in an interactive session, hit Control-Shift-P, and the Jupyter command will be on top. Hit enter again to select that.
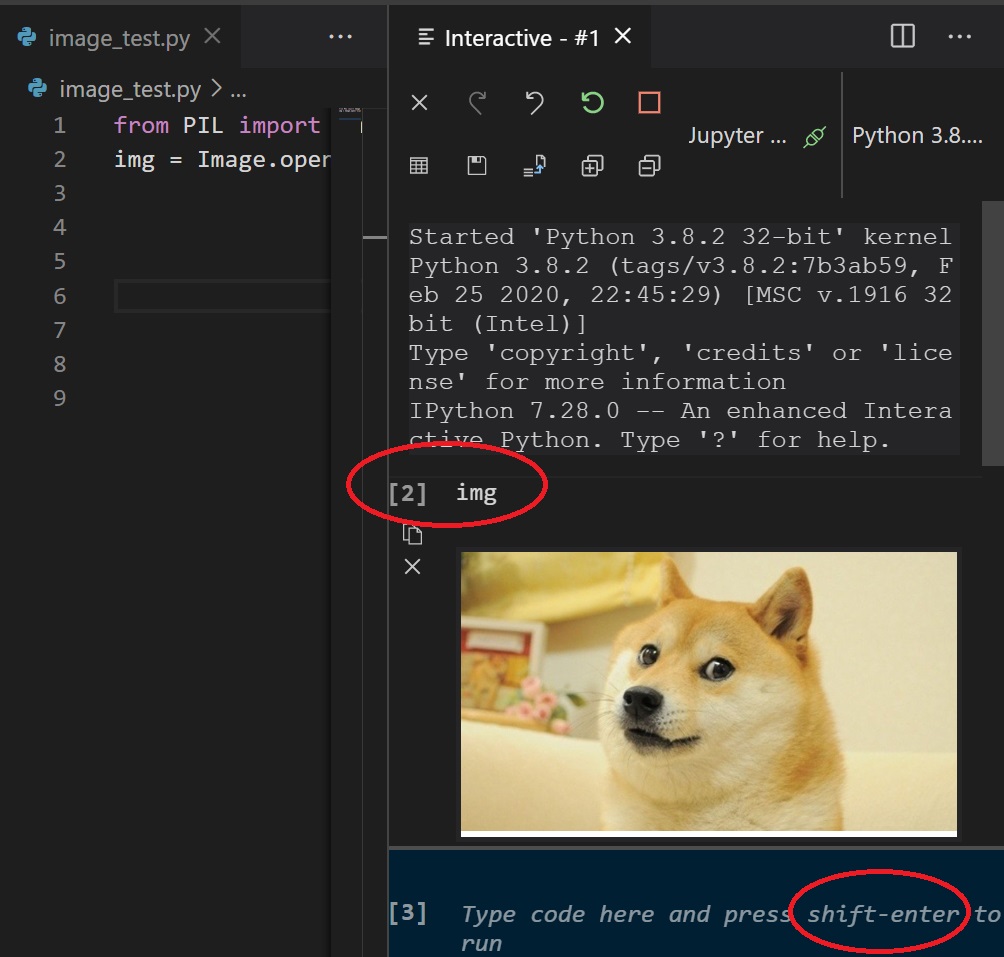
Here’s what it looks like when you run it with Jupyter. I typed “img” into the console and hit “shift-Enter” to run that command. It shows the image object.
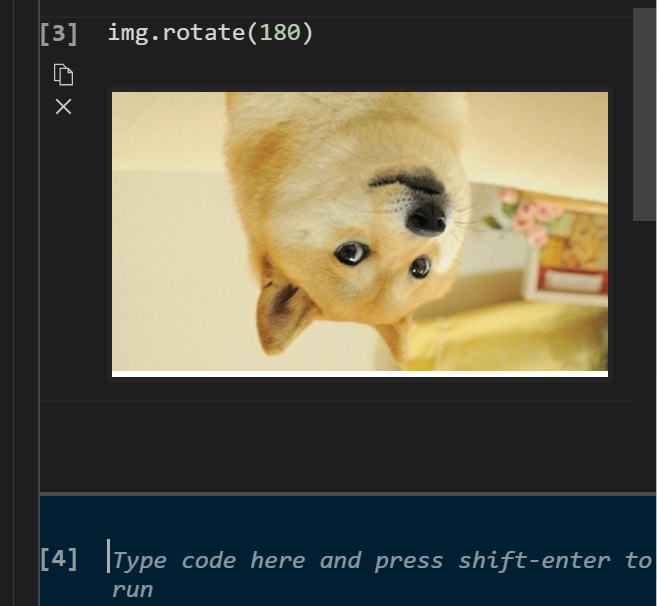
You can also try out functions and get instant feedback to see what happens. Example using rotate function output:

PyCharm
PyCharm is another PC application that can run Python. You’ll have to find the terminal window, where you can type Linux commands.
You’ll install Pillow, which is a copy of PIL that is more recently maintained than the actual PIL.
Type the following command:
pip install Pillow
From the Linn-Mar network, depending on the current settings, you may need some extra stuff to get the network to allow the download:
pip install requests==2.18.4 --user --trusted-host=pypi.python.org --trusted-host=pypi.org --trusted-host=files.pythonhosted.org
pip install Pillow --trusted-host pypi.org --trusted-host files.pythonhosted.org --trusted-host pypi.python.org
You only need to install Pillow once. Don’t install it every time you create or run a program.
PyCharm can import things in the same ways as repl.it:
import PIL.Image
img = PIL.Image.open('filename.jpg')
OR
from PIL import Image
img = Image.open('filename.jpg')
You’ll need to get your image file into the same folder as your Python code file (such as “main.py”). The easiest way is to right click your code file and select “Show in Explorer.” That brings up the folder with your Python file in Windows File Explorer. Put your image file into that folder. You can also copy the file from Windows and paste it directly into the PyCharm file browser, but you’ll have to be careful to make sure it’s in the same folder as the code file.
PyCharm can use either the show() function or the save() function to let you view the images, but it won’t display the image when you type its object name into the Python console.


